


I am planning an introductory course on TDD. In that process I have been thinking about how to convey the productivity gain with TDD.
Being a visual person, I had an idea that would illustrate this in a few pictures. Here they are for your scrutiny and enjoyment!
The main idea is to illustrate how effort over time is affected when using TDD in contrast to not writing tests at all.
We will start off with a new component, respond to feature request and then finally attack some legacy code.
Phase 1: A New Component
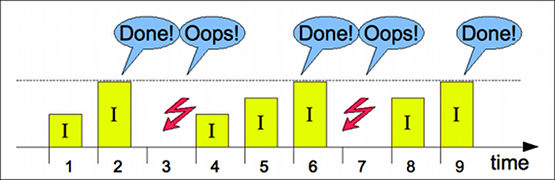
Let’s first look at the creating the component without writing any tests at all. The illustration below shows how you create your first version. The yellow rectangle with an “I” is your perceived progress.
The first time you say “done” and deliver to test, the component comes back with a bug report, illustrated as a red flash. So you go “oops”. As easy as apple pie, you fix that and deliver again only to find that the fixing of the first bug introduced a new, second bug. Oops, again.
Finally, on the third attempt, you succeed and the component is put in production.
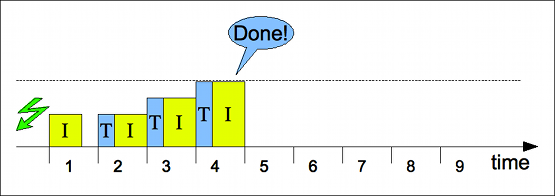
Now let’s look at the TDD way and how that comes out. As you write tests, it will take slightly longer time to reach “done”. Not as much as it feels, though, since in the other case the perceived time becomes shorter as you sit there scratching your head. When you do TDD, you tend to spend more time typing and the perceived time will be somewhat longer.
The tests are illustrated as rectangles with a “T” in them. As you see, they grow with the implementation.
Well, in this scenario, you eventually reach “done” but the component returns from test anyway since you made the same mistake. TDD is not fool-proof. However, the interesting thing about this, is that you don’t introduce a new bug. The test suite that you have written, saves you.
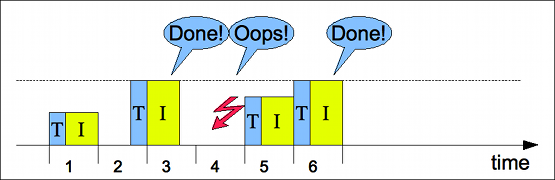
In summary, the time to the first “done” was longer with the TDD way, but the time to pass the test was shorter.
Phase 2: Next Version
We now follow the life of our imaginary component as a request for a new feature comes in. We still compare the two ways of doing development.
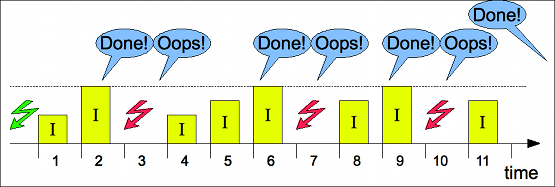
If we don’t have any tests, the scenario probably will be as illustrated here. The new feature puts us in somewhat more trouble than when wrote the first version. The reason is that the code is larger so the risk of introducing bugs gets higher. As you see, we have more attempts at delivering this time.
The code has become more difficult to maintain. We could say it has started rotting, if you see the analogy.
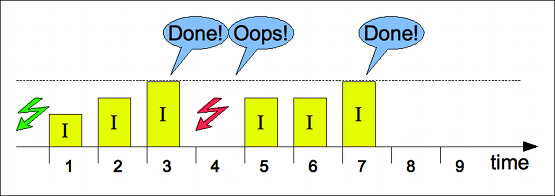
Looking at the TDD way, we find that we have our tests as a safety net for making modifications.
All we do is add some more tests to the suite as we go along and create the new feature for our software.
With the test suite backing us up, the new feature is introduced as easily as when we were coding the component from scratch!

Phase 3: The Legacy Update
TDD would not be particularly useful if it only applied when you started from scratch. Almost 100 percent of our time as developers is spent with legacy code in some way.
Let us assume that you have been given the task to update a software component that has no tests, what do you do?
As above, there are two alternatives and we will look at them both.
With no tests in place all we see is a big pile of … code that we need to change somehow. We read the code, make assumptions about how it works and make the change.
It is a small change so it only takes one trip back from test before going into production. Phew!
Now, doing it the TDD way, you start with writing tests that express your assumptions about how the component works. These tests will fail initially, which is enlightening and they will not cover all of the code, which is not necessary. However, from there on, we add tests and implement the change in a more confident manner.
Since this is a small change it goes through testing to production on the first try. The testers call you and ask you what you have done, they can’t find any bugs! Lean back in your chair and smile, it is a good day in legacy land.
The legacy code is not as horrible anymore as you now have more test coverage when doing the next change. Also, your learning tests in the beginning gave you insights that you wouldn’t have had if you did it the old way.
There are of course other values of TDD and there are some obstacles that you have to learn to overcome. Hopefully this post gave you some motivation to try!
I like this approach, but I disagree with the definition of “done” in the examples. In my opinion, we do not reach “done” in example 1 until time period 9. Each “done” that is followed by “oops” is not really “done” at all, it’s only a candidate “done.”
So, even the first two examples illustrate that TDD saves time. We reach done in time period 9 without TDD, and in period 6 with TDD.
In this sense, I wouldn’t say it takes longer to reach “done” with TDD. Without TDD, defects are hidden until they are discovered in after-the-fact testing or in production. In that case, we haven’t reached “done” at all.